Authentication Settings
The next step in configuring your LiveStream system is adding the details of your organisation’s directory service. LiveStream communicates with directory services using Lightweight Directory Access Protocol (LDAP).
Directory Integration
Please use the information identified in your LDAP Checklist to help you properly set up and configure your LiveStream system to communicate with your directory services.
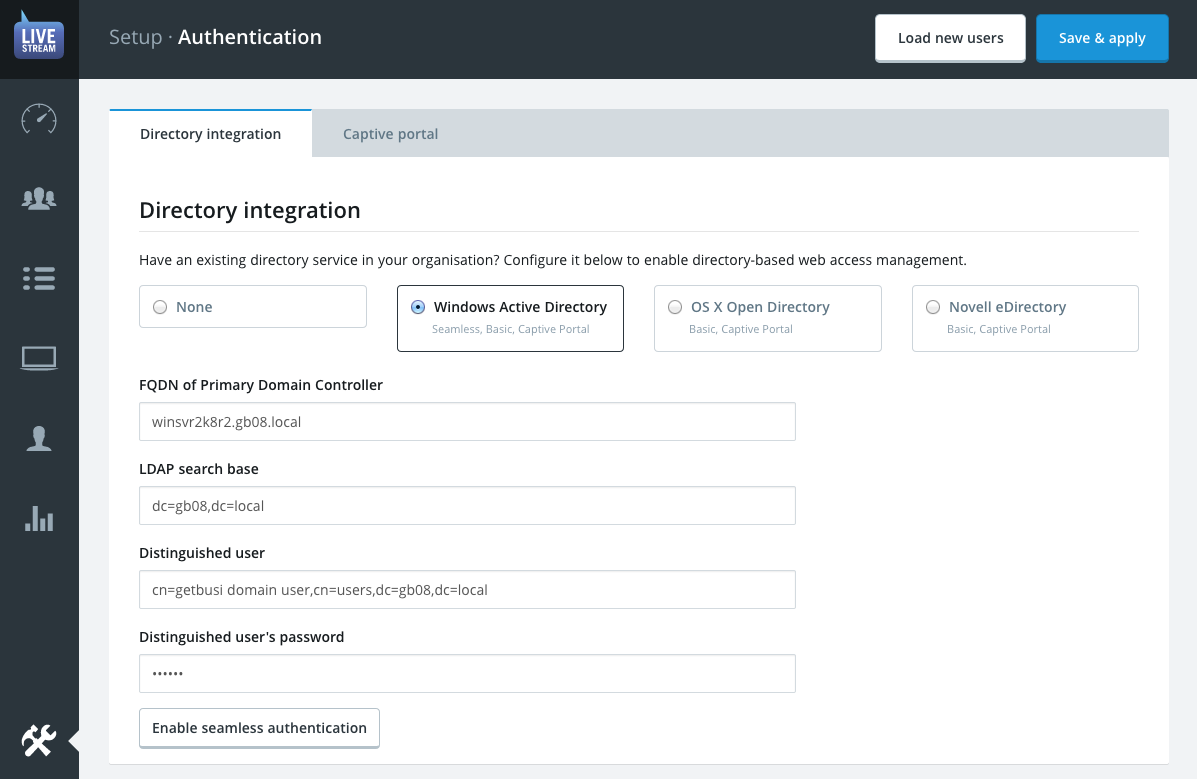
- Start by choosing which type of Directory Service you have.
- Enter the Fully-qualified domain name for your directory server. If you’re not using Active Directory you may use the IP address instead.
- Enter the LDAP search base information for the directory. The search base should be the full distinguished name of the domain. For example, the domain getbusi.local would have the distinguished name: DC=getbusi,DC=local
The Distinguished username field must also be fully distinguished. This user DOES NOT necessarily need to be an administrator.
Warning: These credentials will be stored as clear text in the filesystem so it’s best to create a specific non-privileged user for this role.
By default Active Directory uses the Display Name field for its primary context so if you were using an account with the display name “Getbusi Auth” in the built-in “Users” folder, the distinguished name would be: cn=Getbusi Auth, cn=Users, dc=getbusi, dc=local
By default Open Directory uses the short name field for its primary user context and users as the default container so if you were using an account with the short name “getbusi.auth” the distinguished name would be: uid=getbusi.auth, cn=users, dc=getbusi, dc=local
- Enter the Password for the username you defined in the previous step. This password is stored in plain text in the filesystem, so do not use high-value credentials for this purpose.
When you have entered all the settings for your directory services you may click the save & apply button. If your settings are correct the system will inform you of how many user groups were found in your directory.
Seamless Authentication
ProTip: Seamless Authentication is only available for Windows Active Directories. If you are using a different directory type, skip ahead to Captive Portal.
Enabling this feature means Windows domain computers, using the proxy explicitly, will not be prompted for a username and password when using a browser to surf the web. Seamless authentication uses the authentication tokens from a user's domain login to allow access to internet resources.
This is achieved using the Kerberos and/or NTLMv2 protocols and is only available on computers where the user must log on to the same domain that LiveStream authenticates with.
Pre-requisites
The client computer will typically decide which authentication method it wishes to use. However, LiveStream will also fall-back to NTLM authentication if Kerberos negotiation fails. If NTLM fails, Basic authentication will be used.
DNS Records — The Kerberos Negotiate method in particular requires both an A record and matching PTR record be resolvable in the primary DNS server so that the system’s IP can be resolved to a fully-qualified hostname in either direction. The process of adding these records varies depending on your version of Windows Server.
Client proxy configuration — Client machines must be configured to connect to the proxy via the fully-qualified hostname rather than the IP address if you wish to use the Kerberos Negotiate method. Windows clients connecting to the proxy by IP address will default to the NTLM method.
Enabling Seamless Authentication
Once the directory service has been successfully configured the Enable seamless button at the bottom of the form to launch the configuration dialogue menu.
- From the drop-down select which version of Windows Server for Active Directory is running on: 2003, 2008 or 2012.
- The fully-qualified domain name should match that of your Active Directory domain not the hostname of the sever which is already specified in the directory service settings.
- The NetBIOS domain name should match that your Active Directory and is typically shortened to just the first domain component of the Active Directory domain. For example, if the FQDN was getbusi.local then NetBIOS version would be GETBUSI.
- The Administrator username and password fields are required to join the LiveStream server to your domain. Please ensure you use a user account that is a member of the group Domain Admins.
Click the enable button and wait a few moments while the system configures the Windows networking services and joins your Active Directory.
Captive Portal
Captive portal is an authentication mechanism designed to work with intercepting proxies. It is the only user authentication method that is compatible with intercepted clients.
Learn more about intercepting proxy mode and it's purpose in the Concepts section.
As discussed elsewhere in this document, LiveStream can automatically intercept web requests on port 80 and 443 for filtering. But because the proxy is transparent to the browser, there’s no way to trigger proxy authentication in the usual way.
ProTip: Because captive portal authentication is transparent to the web browser it will avoid typical proxy authentication compatibility problems experienced by some applications.
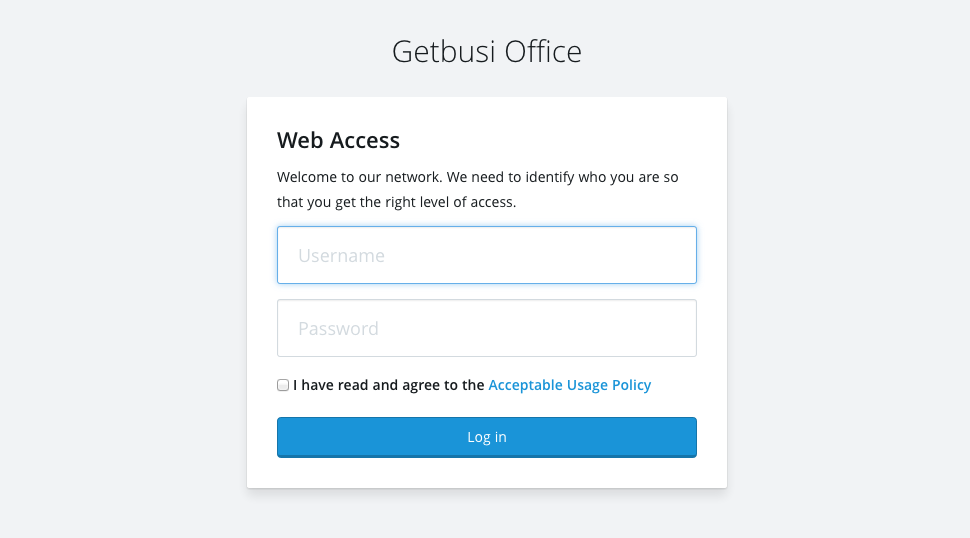
Captive portal will detect when an unauthenticated device is intercepted and prompt them to login via a web-based splash screen. Successful authentication will associate their username with their device's IP Address or MAC address for a set period of time, depending on the captive portal mode.
ProTip: Many operating systems, such as OS X and iOS will detect whether or not captive portal login is required when they connect to a WiFi network and present the login page without needing to open a web browser.
Captive Portal Modes
There are three captive portal modes to choose from. If you only plan on configuring explicit proxy settings on your client devices then you should leave the mode set to Off.
1. Usage Agreement Only
This mode does not require clients to authenticate, but simply agree to the Acceptable Use policy defined in these settings. The usage agreement will be presented when they first connect to the intercepting proxy. Because this mode does not require user authentication devices must be in an active Device Group in order to be granted web access.
Best used for: free WiFi hotspots etc. where user authentication isn’t *available but a usage agreement is necessary.
- Idle timeout determines how many minutes an idle device’s usage agreement session will remain active in until the system prompts them to agree again.
- The Hard timeout value determines the maximum amount of time any active session can last before the user is forced to re-authenticate. Keep in mind that it’s impossible to manually log out of a captive portal session.
- The Acceptable use policy or AUP allows you to define the agreement that the user must accept before they are allowed to access the web via the LiveStream system. Your organisation probably already has one. If so, simply paste it into this field.
2. Authentication
This mode will prompt users to enter a username and password to identify themselves once their web traffic is intercepted. When the user authenticates successfully their current IP address will be associated with their username until time-out minutes have elapsed.
Best used for: networks where intercepted devices may be used by multiple users throughout a day.
- Idle timeout determines how many minutes an idle device’s authenticated session will remain associated with a user until the system prompts for authentication again.
- The Hard timeout value determines the maximum amount of time any active session can last before the user is forced to re-authenticate. Keep in mind that it’s impossible to manually log out of a captive portal session.
- The Acceptable use policy (optional) or AUP allows you to optionally define an agreement that the user must accept before they are allowed to authenticate to access the web via the LiveStream system. Your organisation probably already has one. If so, simply paste it into this field.
3. Device Registration
This mode will prompt users to enter a username and password to identify themselves once their web traffic is intercepted. When the user authenticates successfully their MAC address will be associated with their username until the configured date timeout occurs.
Best used for: BYOD networks where intercepted devices typically belong to just one user.
Warning: MAC addresses are transmitted using ARP, which cannot traverse subnets. This mode will not work for clients that are in a separate VLAN to LiveStream 5.
- The Date timeout value determines the next date that all device registrations will be cleared, forcing users to reregister them. At a school you might set this to the end-of-term or end-of-year date.
- The Acceptable use policy (optional) or AUP allows you to optionally define an agreement that the user must accept before they are allowed to authenticate to access the web via LiveStream 5. Your organisation probably already has one. If so, simply paste it into this field.
Clearing sessions
If at any point you need to update the captive portal configuration, you should also clear all the current authenticated sessions. This will ensure that all clients must re-authorize their devices using the new timeout(s) etc. To do this simple click the clear current sessions button.
When you're satisfied with your captive portal configuration click save & apply and then navigate back to the setup index.
API Authentication
API Authentication allows the proxy to offer seamless authentication for any device that can make scripted HTTP requests, regardless of operating system or connection mode.
Authenticating users via the web API is not "true" proxy authentication, nor are users' passwords ever exchanged with via proxy. This has a number of benefits and drawbacks:
The Web API operates completely externally from the the client browser by associating the username with their device's IP address. This means it will work whether they are connecting to the proxy explicitly or transparently.
Because the web API can't accept user passwords itself, it should only be called by when a successful authentication event occurs on a device. In most cases this will mean using the operating system's login and logout scripting tools. Certain MDM systems may be able to trigger web API requests as well.
ProTip! Mac OS X login hooks can use the variable
$1to print the short username of the account that's logging in.An API-authenticated browsing session is ended either when the device calls makes a request to
http://proxy.address/api/logout/, or another username requestshttp://proxy.address/api/login/from the same IP address.
Example API Calls
On a Unix-based system like Mac OS X, scripted web requests are typically made
using the curl
utility. For example:
# Create an authenticated proxy session for the user that's logging in
curl http://proxy.address/api/login/ \
    -d api_key=abcdefghijklmnopqrstuvwxyz1234567890 \
    -d username=$1
# End the authenticated proxy session for the user that's logging out
curl http://proxy.address/api/logout/ \
    -d api_key=abcdefghijklmnopqrstuvwxyz1234567890 \
In Windows 7 SP1 and later, the PowerShell 3.0 command Invoke-WebRequest
can be used to perform the necessary POST requests.
# Create an authenticated proxy session for the user that's logging in
$postParams = @{api_key='abcdefghijklmnopqrstuvwxyz1234567890';username='$env:username'}
Invoke-WebRequest -Uri http://proxy.address/api/login/ -Method POST -Body $postParams
# End the authenticated proxy session for the user that's logging out
$postParams = @{api_key='abcdefghijklmnopqrstuvwxyz1234567890';}
Invoke-WebRequest -Uri http://proxy.address/api/logout/ -Method POST -Body $postParams
Next up: Proxy Settings.